User Authentication Using AWS Cognito
In this tutorial series we will make use of AWS Cognito for handling user authentication in our React JS Application.
The main focus of this series is AWS Cognito and the Authentication Flow in React JS, What our react app actually does after authentication doesn't matter.
Let's begin.
What's AWS Cognito?
Glad you asked.
Based on their own definition
Amazon Cognito lets you add user sign-up/sign-in and access control to your web and mobile apps quickly and easily. Cognito scales to millions of users, and supports sign-in with social identity providers such as Facebook, Google, and Amazon, and enterprise identity providers via SAML 2.0.
It's an* awesome service provided by AWS. Cognito takes care of managing our users so we can focus on building the app rather than managing users or their authentication.
Multiple apps can make use of same user pools ( user groups ), Making it easier for users to use multiple apps by your organization without creating multiple accounts.
AWS Cognito Terminologies
Once you start using AWS Cognito, you will keep hearing/using these terms
- User Pools
- Federated Identities
User Pools are like directory/groups which keep track of all the users in that specific group, list of all the apps that can access the group and other advanced options.
Federated Identities are similar, But they are used when we're using Social Media accounts for user authentication like Facebook, Google, Twitter, etc.
Creating our First User Pool
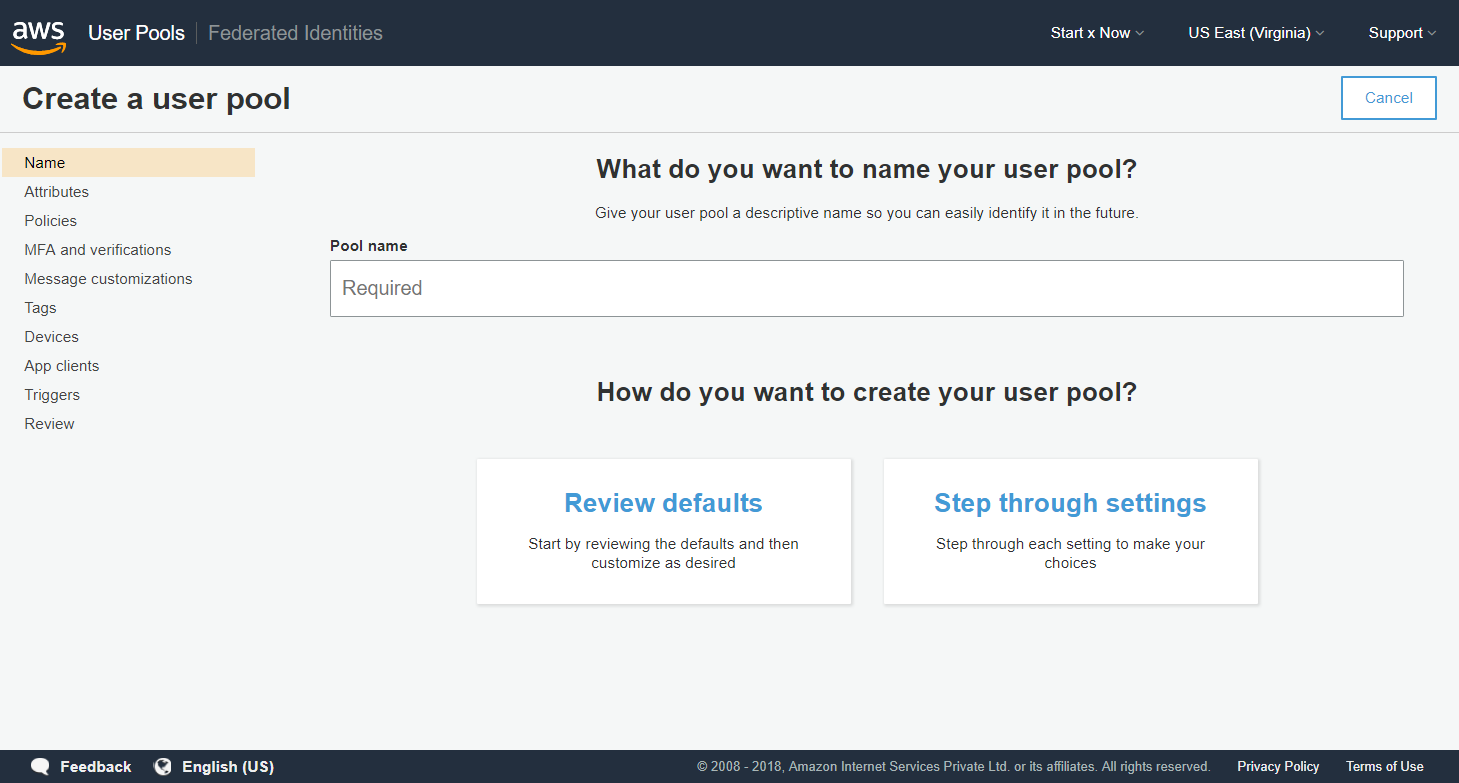
Open AWS Cognito and click on Manage your User Pools button., If you don't see it, It will be named something similar so click on that or Click Here
Now you should see Create a user pool button, click on that.
The page will look like the screenshot below.

For Pool name enter big-money-salvia or something original.
For How do you want to create your user pool? click on Step through settings
Now you will be taken to Attributes page
Attributes Page
The first option we see is How do you want your end users to sign in?, Depending on your requirements you can choose the option that best fits you, I will go ahead with Username and check all the three options under it.
[updated] For Which standard attributes do you want to require? I will select email field.
[previous] For Which standard attributes do you want to require? I will select
nameandphone number.
For Do you want to add custom attributes? I will leave it as it is, If you want custom field, You can enter it here and make it required.
After selecting the fields, Click on Next step to continue and goto Policies page.
Policies Page
For What password strength do you want to require? I am going to leave it as it is, You can make the customizations to suit your app/organization needs.
For Do you want to allow users to sign themselves up?, I am going to go with the default Allow users to sign themselves up option as I want the users to be able to register themselves.
For How quickly should user accounts created by administrators expire if not used? I am going to set it to 3 days, Again you're free to choose the number according to your needs.
Now click on Next step.
MFA and verifications Page
Here we can enable Multi Factor Authentication if we want to.
For Do you want to enable Multi-Factor Authentication (MFA)? I am going to select Off.
For Do you want to require verification of emails or phone numbers? I will keep the default Email selected.
For You must provide a role to allow Amazon Cognito to send SMS messages I haven't selected verification of Phone Number so I am going to DO Nothing.
Click on Next step.
Message customizations
Now we're taken to the message customizations page, Here we can customize the message sent to the users, Please go through it and make the customizations you want.
You can also customize the FROM and REPLY-TO email addresses.
I am going to leave the defaults and click on my favorite button Next step
Tags
Do you want to add tags for this user pool? No.
Click on Next step.
Devices
Do you want to remember your user's devices? Depends on you, I will select the default No.
Click on Next step.
App Clients
Which app clients will have access to this user pool?
Here we can define the clients which will be able to access this user pool.
Our Frontend App will access this user pool, So let's add our client.
Click on Add an app client link.
For App client name enter frontend. Leave everything as it is and click on Create app client button.
Click on Next step.
Triggers
We will skip this for now and later go through this in depth.
Click on Next step.
Review
Review everything, Make any changes if you have to, If everything looks good click on the Create pool button.
After few seconds your user pool will be created, Please note down your Pool Id it will look something like us-east-1_11R1111X
Also click on App clients page and you will see your App client id there, Please note it down as we will need this later on.
Creating our First Federated Identity
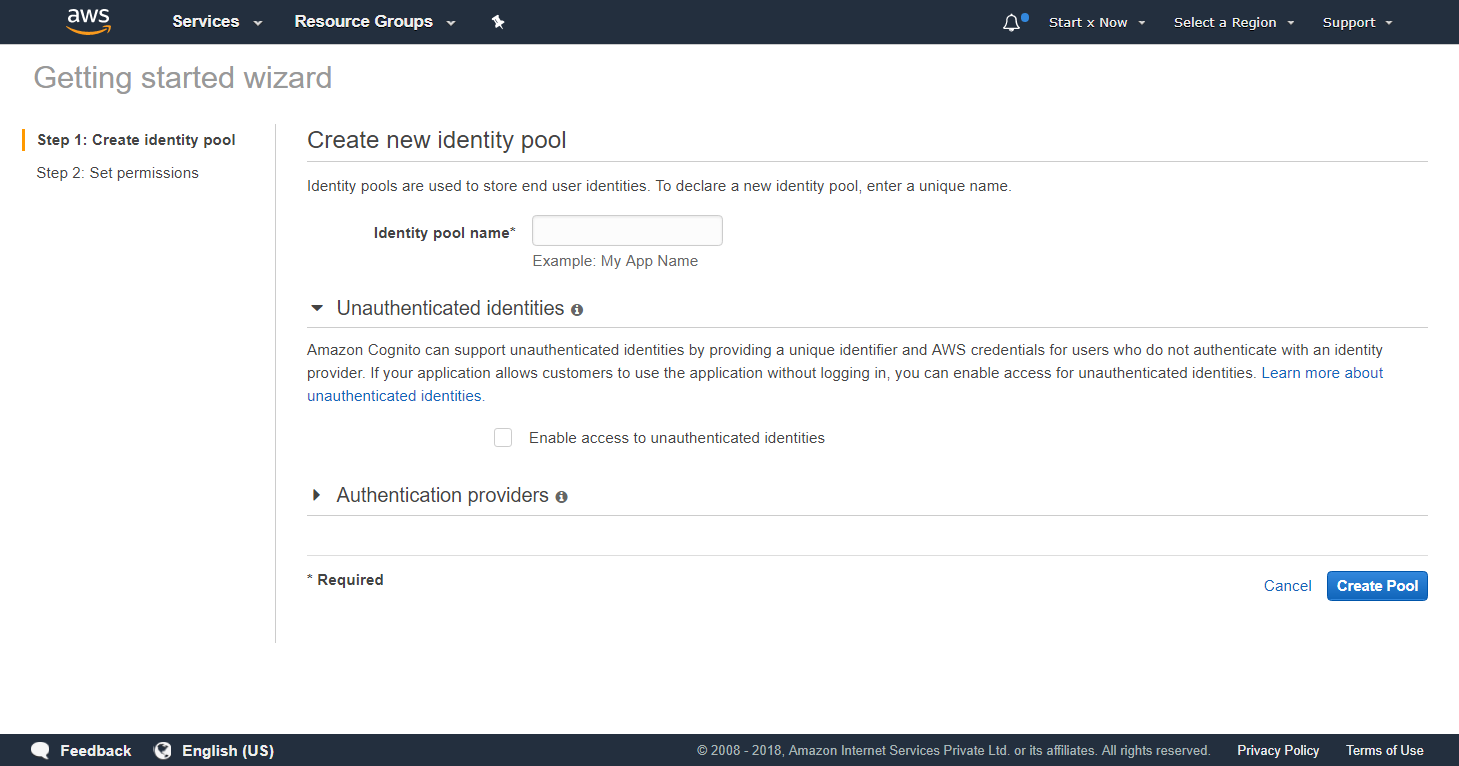
Open Federated Identities page and click on Create new identity pool button.
The page will look like the screenshot below.

For Identity pool name enter Salvia Federated Identities or something original.
[updated] For Unauthenticated identities I am going to Check it.
[previous] For Unauthenticated identities I am going to leave it unchecked.
Now, click on Authentication providers and select Cognito
For User Pool ID enter the id of the user pool we just created Ex: us-east-1_11R1111X
For App client id enter the ID of the client we created earlier, You can create another client if you want to Ex: 49834734shdgjdghf34875
Now click on the Create pool button at bottom right.
You will see a page saying Your Cognito identities require access to your resources
Click on Allow button.
Now you will see Getting started with Amazon Cognito page., In the Platform select Javascript and copy the AWS Credentials you see.
It will look something like
// Initialize the Amazon Cognito credentials provider
AWS.config.region = 'us-east-1'; // Region
AWS.config.credentials = new AWS.CognitoIdentityCredentials({
  IdentityPoolId: 'us-east-1:1111xxxx-xx22-xxxx-xxxx-xxxxxxxxxxxx',
});
Save this somewhere as we will need it when creating our frontend.
Conclusion
In this tutorial we created our first User Pool and Federated Identity.
In next tutorial we will Create our Frontend and implement User Authentication using Cognito., And in future tutorials we will dig pretty deep into advanced features of cognito and it's react counterparts.
On a sidenote: I am working on an Advanced tutorial for building Serverless SAAS App using Node, React and AWS., Do subscribe to my Newsletter to be notified about it.
Meta Information
January 08, 2018 at 12:40 PM, updated on January 09, 2018 at 01:40 PM and is written by Dhruv Kumar Jha (me).